Winter Workshops – Sign Up NOW!
Three Dudes and Boards, First Place, Drawing MASF 2013 Exhibition COMING SOON IN TWO LOCATIONS: The Secret ...

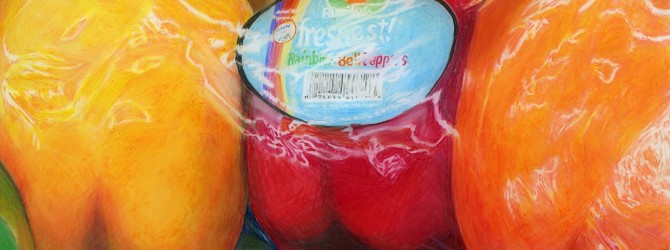
I recently undertook a special project to help out Grafix, the makers of Dura-Lar and other drawing films, who wanted art for an instructional video. (I will post the link when it’s online.) The artwork was left unfinished so that in the video, the use of both sides of the drawing film is more evident. When it’s returned, I’ll finish it up completely, but it’s pretty cool as it stands now.

Front side, in progress
The peppers are done on Dura-Lar from my own photo with Prismacolor pencils. Prismacolor Verithin pencils were also used for sketching outlines and some coloring.
Initial colors were worked on a heated work surface so they would soften and blend easily. As the work progressed, I worked mainly on a regular table, but I did take the piece back to the heated surface a few more times when I felt softening the color would give smoother blending and better coverage.
The film was flipped over frequently so additional colors could be applied to the back. In most cases, complementary colors were applied to the back so they would make richer shadows for the darker local color applied to the front.
Reverse side, in progress
This is still evident in the unfinished green peppers across the bottom. Tuscan Red, which is the darkest red, was applied behind the shadow areas of the green peppers, which I have started to fill in on the front with Dark Green and Grass Green. Note also some greens behind the unfinished yellow, orange and red peppers at the top, and Tuscan Red behind the vertical shelf support at the top left.
Also applied on the back is Dark Umber, which was used to darken the deep space between the green peppers. This space is mostly Indigo Blue on the front, with Dark Green and some reds and the Umber added.
I left the strokes obvious in the unfinished areas. This is how the color was initially applied in most parts of the drawing. But as you can see, the strokes do not show in the finished parts, where colors were blended in three ways. A soft eraser in pencil form was used to smooth out strokes, both over heat and on the table. A colorless blender pencil also was used, and this worked especially well on the heated surface. Colors were also blended simply by using extra pressure with the dominant color on top. In some places, colors were worked with pressure from the harder Verithin pencils.
I used the “pencil” eraser mentioned above and a kneaded eraser to make corrections and to bring back “white” (transparency so the backing board can show through) although most highlights are done with white colored pencil. In a few places, thin white lines were done by scratching carefully with the tip of an X-Acto knife.
I will finish this piece by adding more color on both sides and blending it out as described. The green peppers will look as smooth and realistic as the ones across the middle. Going back to the heated work surface will probably be important for unifying the finished effect.

Reverse side, in progress

http://www.youtube.com/user/BlickVideos#p/u/18/0Vk0eP0HqSU
My work was also featured in the Grafix video.
Melissa..I was just looking at duralar the other day..would you please email me when the video is finished and available? I would love to see all described above and its progress:>) amazing work..looks like a very challenging surface?
The video is on the Grafix site, http://www.grafixarts.com and look under Ideas, How To Videos, or see it directly at http://www.youtube.com/watch?v=0Vk0eP0HqSU. The finished artwork is on the Grafix site in their gallery too.
Sorry to be slow in responding, I’ve only recently updated the website to be able to work with comments!
Melissa